Hey guys! In this article I want to show you my journey in the world of diy modular synths from the beginning to where I am now. The first thing I soldered together was a kit for a guitar pedal and that wasn’t successful. So I got another one some time later which worked out. After that there was a long break of building stuff.
Then I a saw a video of Sam Battle, look mum no computer, where he went through all the functions of his diy modular synth. I instantly got fascinated by the machine itself and the fact, that it’s possible to build something like that by yourself. Two years or so went by and I gave it a shot, finally.
The first project I’ve build was the auduino by notes and volts. I already got a little stompbox case from my first failed guitar pedal build with the exact amount of holes in it – perfect! I ordered all the parts and built it. By following the tutorial on youtube it worked first try. Later I turned it into that little sequencer.
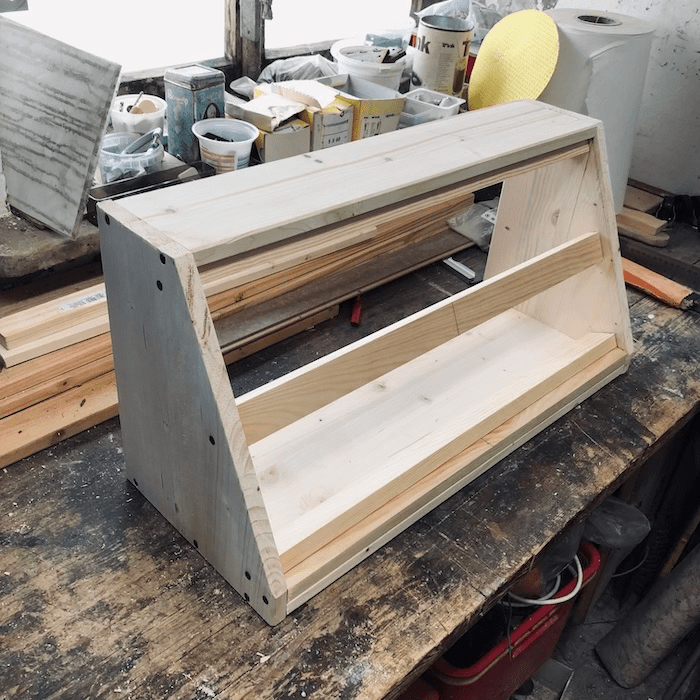
Now I wanted to get more serious and build a real modular synth. First thing was to build a case. I just made a sketch on a piece of paper and tinkered around what size it should have. Of cause it was important to set the size for my future panels. I went to the local hardware store and had a look what sheet metal was available. They got 20x100cm and 12x100cm. Now a had to choose between the KOSMO format or the smaller 12cm version and I went for the smaller one, since I wanted to keep it compact to make more of the available space I got. Now it was time to build the case. I just screwed together some wood and here is the result.

Now there had to be a power supply. I didn’t want to build one on my own as a first project with nearly no experience. That’s also what I recommend for beginners. Luckily Behringer just launched the CP1A psu that provides 1A on + and – 12V for just 50€. Of cause it’s no high end psu, but with 1A you can get a long way and I never had any problems with it.
Now I got a case and some juice. Time to build some modules! My first project was the simple CEM3340 VCO stripboard version by Sam Battle and I build two of them right away. Both worked first try and it was an awesome feeling to finally be able to make some noise. But I never got them to track 1V/Oct.

Now I wanted to have some modulation and built the LFO by Niklas Rönnberg followed by the VCF and mixer by Sam Battle.

Finally, I discovered the website of Eddy Bergman, which was a goldmine to me! It’s the source of most of my modules. So time went by and I just couldn’t stop building. Here is the result after about a year. I also wanted to have some more beautiful panels, so I gave them a finish with some spray paint. The labeling was from now on done by my girlfriend, since my handwriting looks like I was still in preschool. Thanks to Anne!

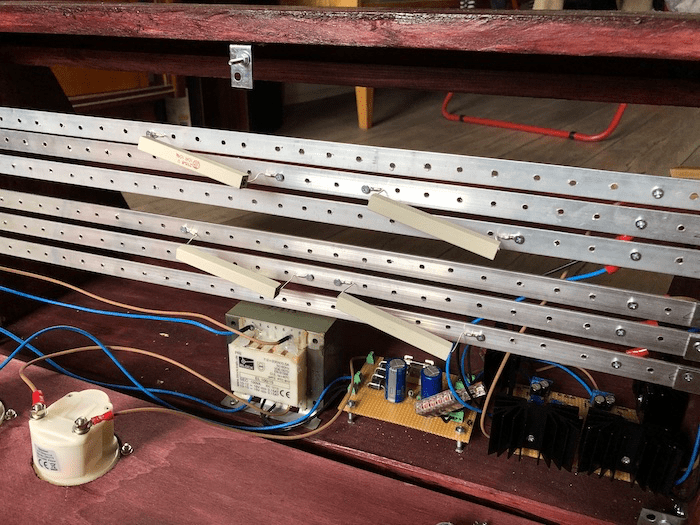
As you can see there was not much space left and I got so much more ideas on what I’ve wanted to do next. I also was now confident enough to build my own psu. I wanted to have one with a good and heavy transformer which will provide more than enough of clean power: 2x15Vac with 3.25Amax on each secondary. I also used the schematic by Eddy Bergman for that and combined it with the Hinton approach, using aluminum rails for the power distribution. I also built another case.


To see if I can trust my freshly built psu I gave it a little stress test. For that I calibrated both regulator boards to +-12V and put some 17W power resitors over the rails. By Ohm’s law you get 1.2A on each regulator (I = U/R; I = 12 V/10 Ohm = 1.2A). Also keep in mind that you have to stay below the power rating of your resistors (P = I * U = 1.2 A * 12V = 14.4 W). They get really hot, so don’t burn your fingers. The regulators itself are designed to withstand 1.5A and it’s important to use some heatsinks. I left it on for two hours and it passed the test!
That heralded the next chapter. Now I moved all my modules into the new case, built some new, and that’s what it looks like.
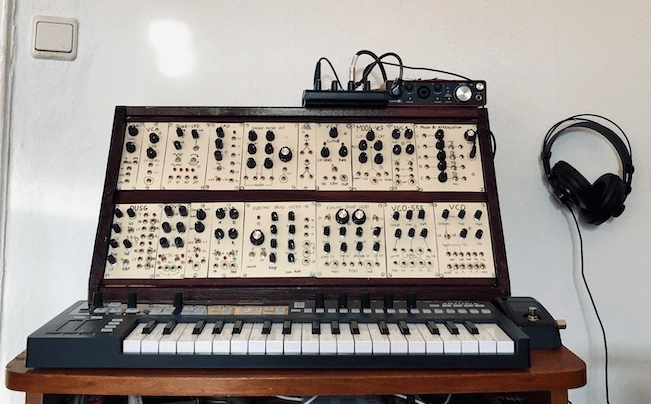
I also got a Keystep Pro, which is an awesome sequencer that’s perfect to control your modular. It definitely burns a hole in your pocket, but it’s worth it. For the output and as a headphone amplifier I got a small mixer (Mackie Mix5) and some headphones (Superlux HD-681). For recordings a use the Scarlett 2i2 interface.
I’ve learned a ton about electronics during the building process. Many hours went into troubleshooting. That can be frustrating but it’s the best teacher too. I started out building stripboard layouts if I was painting by numbers. Now I’m able to design my own and I know what to do if I got a malfunctioning module. Patience and fun are definitely the most important factors in this hobby.
Now it’s February 2022 and my case is full and finished. The last projects were the NLC Feague, Serge VCM and Serge SSG. This was the first time for me to really make some more complex modules from stratch and transfer them into a stripboard layout. So cool it worked out!


Now it’s time to make a dream come true which I’ve had in mind for a long time now – the old Metasonix modules TS-21, TS-22 and TS-23. I’ve dived deep into to the history on wiggler, youtube and what not. But information to these deviced, like demos or building experiences, are almost not available! I like the attitude of Eric Barbour and Matesonix and I just want to experience the results of his work from the early days of his company by myself. The only possibility to do that is to build it on my own, since he just made a hand full of those back in the day. By now (Jan. 2022) the case is already done and I ordered all the parts I need to tackle this project. I recycled my first case for that. I’m so stoked on how it will turn out!

